Angular is a modern, highly performant application framework. Learning Angular is one of the best things you can do in your career as a web developer. But it is no good if your code does not work, which is where a good test suite comes into play. I have built amazing applications with Angular for over three years now and I have found Angular to be a great solution for most use cases. I am a big fan of automated testing and Angular has great tooling to support this.
Generally speaking, there are three main reasons for writing good automated tests:
- Increase the quality of your software and find bugs before hitting production.
- Have your test as as a safety net so that you are confident to make a change in the future.
- Document your code. The tests you write should make the purpose of your code very clear. This means that a new developer can look at the tests for a feature and quickly understand the goal.
Table of contents
There are three types of automated tests in Angular:
- End-to-End Tests (E2E)
- Unit Tests
- Integration Tests
Unit testing and end-to-end testing are generally well-defined. However, integration testing is more of a vague concept that may mean different thing to different people.
End-to-End Tests (E2E)
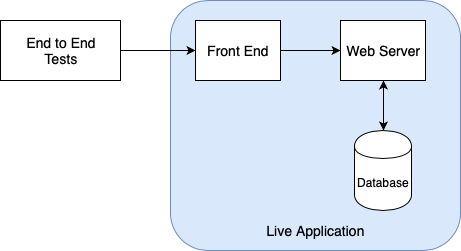
End-to-End testing the kind of testing that is done against a live, running application. This means the application is running with a database, web host and front-end. The tests exercise the application by manipulating the browser in an automated way.
Manipulation of the browser includes button clicks, typing values into form inputs, scrolling, navigation etc.
The only benefit of writing end-to-end tests is that it validates the application works as a whole. As with any other testing methods, end-to-end tests can drive the functionality – or at least let you make a start implementation with a simple flow. When combined with BDD (Behaviour-driven development), E2E tests are very helpful as you can often get the whole team (product owner, testers, designers) and nail down the acceptance criteria of a user story.
The downsides to end-to-end testing are to do with speed and difficulty of browser manipulation. E2Es are also generally less reliable than other types of tests. Especially testing third-party components like values in an email can be a pain to setup.
When you generate an app with ng new command, Angular cli creates the following simple end-to-end test that makes sure the page title is displayed correctly. Notice how the page object class is manipulating the browser with protractor, which internally uses Selenium web driver.
import { AppPage } from './app.po';
import { browser, by, element } from 'protractor';
describe('hello-world App', () => {
   it('should display welcome message', () => {
    let page = new AppPage();
    page.navigateTo();
    expect(page.getTitleText()).toEqual('Welcome to Angular!');
  });
});
// Page object that allows access to elements on the page
export class AppPage {
  navigateTo() {
    return browser.get('/');
  }
  getTitleText() {
    return element(by.css('app-root h1')).getText();
  }
}
Unit Testing
On the other end of the testing spectrum, we have unit testing. Unit testing in Angular, like many other frameworks, is done against a unit of code. Unit testing is usually the most talked about kind of testing in the world of software developers. This is because we, as developers, write more unit tests than any other kind.
A unit of code can mean different things to different people but a generally accepted unit is a single class. Services, pipes, directives, component classes are all considered as single units of code.
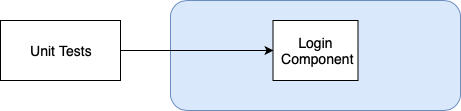
In the diagram above, you can see that the unit test execute against login component to verify functionality. If we had, say a LoginHelper, you could consider this to be part of the login component and test them together. This depends on what your understanding of a unit is. I personally endorse unit testing each individual class.
Consider the following simple class:
class Calculator {
    constructor() { }
    add(num1:number, num2:number) {
        return num1 + num2;
    }
}
We can test the add method very easily with a unit test:
describe('Calculator - add', () => {
   it('should add two positive numbers', () => {
     let calc = new Calculator();
     let result = calc.add(5,8);
     expect(result).toEqual(13);
   });
  it('should add positive and negative numbers', () => {
     let calc = new Calculator();
     let result = calc.add(5, -8);
     expect(result).toEqual(-3);
   });
 });
Mocking
Mocking is a fundamental concept that you need to grasp, if you’re interested in writing good tests. This important concept allows us to test one thing at a time, even though it depends on other units of code. Unless you’re writing a simple calculator app, it is most likely that the classes you create require other classes to work.
A login component would probably delegate logic to something like an authentication service. The recommended way to bring in dependencies in Angular is to use constructor injection.
When writing unit tests, we should not be testing the real authentication service as well as login component. The reason is that the authentication service could be making HTTP calls, work with application state etc. These are the responsibilities of the authentication service and we don’t need to worry about how it works while testing the login component.
A mock is a class that looks like the real class but we can control its following behaviour:
- what its methods return
- throw exceptions
- verify whether its methods have been called
Although the term mock is widely used, there are different kinds of mocks:
- Dummy: A simple object placeholder that does nothing interesting. It has no behaviour
- Stub: An object that has controllable behavior. If we call a certain method on a stub we can decide in our test what value that method call will return.
- Spy: An object that keeps track of which of its methods were called, and how many times they were called, and what parameters were used for each call.
Consider the following LoginComponent that injects a AuthenticationService through its constructor:
@Component({
    selector: 'app-login',
    templateUrl: './login.component.html',
    styleUrls: ['./login.component.css']
})
export class LoginComponent implements OnInit {
    constructor(private authService: AuthenticationService) { }
    ngOnInit() {
        this.titleService.setTitle('Login');
    }

    login (username:string, password:string) {
       this.authService.login('username','password');
    }
}
We will use a spy to test that the login method of the AuthenticationService is called:
describe('LoginComponent', () => {
   it('should set the page title', () => {
     const authService = jasmine.createSpyObj("AuthenticationService", ["login"]);
     const component = new LoginComponent(authService);

     component.login('johndoe@gmail.com','password123');
        expect(titleService.setItem).toHaveBeenCalledWith('johndoe@gmail.com','password123');
   });
 });
The test above creates a spy object authService using jasmine library, which allows us to verify that its login method is called with correct parameter values.
Integration Testing
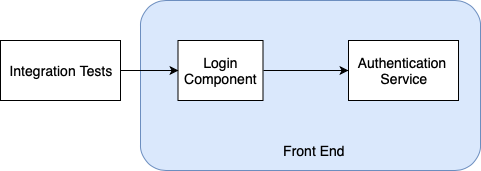
The last kind of testing in Angular is integration testing, which is half-way between unit testing and end-to-end testing. Integration testing is more than a single unit but less than a whole application. So an integration test consists of at least two units of code.
There are two types of integration tests:
- Shallow integration tests: Test a single component on its own, ignoring its child components.
- Deep integration tests: Test a component with some or all of its child components.
Examples of integration tests:
- Component’s template (html) and class file. e.g. making sure button click updates a variable [Shallow].
- Testing two components in a parent/child setting. e.g. testing whether the parent component passes in the correct value to the child component [Deep].
Due to the nature of how Angular components work, integration tests are written in much the same way as unit tests. So, Angular has tooling that allows us to write integration tests that can make sure the template and the component class work well together. This kind of testing is a true example of an integration test.
TestBed
The TestBed is part of @angular/core/testing package and allows us to test both the component and its template running together.
Angular TestBed achieves this by letting us create a special module, just for testing purposes. There are a few methods available on the TestBed, but the one that we use most of the time is configureTestingModule.
Normally, you may find that some modules in your Angular application import many external modules, provide services and declare components. The configureTestingModule accepts a single parameter that is an object, which matches the layout of a typical application module.
Shallow Integration Test Example
Let’s create a shallow integration test for the login component.
HTML template:
<button id="login" (click)="login('testuser', '12345678')">Login</button>Component:
@Component({
    selector: 'app-login',
    templateUrl: './login.component.html',
    styleUrls: ['./login.component.css']
})
export class LoginComponent implements OnInit {
    constructor(private authService: AuthenticationService) { }
    ngOnInit() {
        this.titleService.setTitle('Login');
    }

    login (username:string, password:string) {
       this.authService.login('username','password');
    }
}
Test file:
describe('LoginComponent', () => {
    let component: LoginComponent;
    let fixture: ComponentFixture<LoginComponent>;
    let authService: any;
    beforeEach(async(() => {
        TestBed.configureTestingModule({
            declarations: [LoginComponent],
            providers: [
                {
                    provide: AuthenticationService,
                    useValue: jasmine.createSpyObj('AuthenticationService', ['login', 'logout'])
                }
            ]
        }).compileComponents();
    }));
    beforeEach(() => {
        fixture = TestBed.createComponent(LoginComponent);
        component = fixture.componentInstance;
        authService = TestBed.get(AuthenticationService);
    });
    it('should create', () => {
        fixture.detectChanges();
        expect(component).toBeTruthy();
    });
});
We have two test level variables: component and fixture. We use the component variable throughout our tests to verify result of an action. The fixture has many features for testing/debugging but the most frequent purpose is to get elements from the template.
After setting up a testing module, initialising fixture and component variables, we pull the authentication service spy from the DI (Dependency Injection) container and store it on a variable. The reason is that we want to manipulate the spy when running our tests.
Let’s make sure the login method is called when the button is clicked in the template.
it('should call login method on authentication service when login button is clicked', () => {
  const loginButton = fixture.debugElement.query(By.css('button#login')).nativeElement;
  loginButton.click();
  fixture.detectChanges();
  expect(authService.login).toHaveBeenCalledWith('testuser', '12345678');
});
The component fixture allows us to query HTML elements on the template. Once you retrieve the element (like the button above), you can interact with it e.g. click it.
Following any interaction with the DOM, you need to call fixture.detectChanges() to force change detection in Angular. Without this, you may find that your spy would not have been called.
Deep Integration Test Example
When you have child component inside a component’s template, you may wish to test them together. Like for example, you may want to make sure the input parameter passed into the child component is correct.
Let’s consider the following simple component, which accepts a parameter and displays the value in the template.
import { Component, Input } from '@angular/core';
@Component({
  selector: 'app-heading',
  template: `
  Welcome to {{title}}
  `
})
export class HeadingComponent {
  @Input() title: string;
}
and we render this inside the template of the login component:
<app-heading title="Login"></app-heading>
<button id="login" (click)="login('testuser', '12345678')">Login</button>
We can query the child component and make sure it has the correct title like so:
it('should initialise page heading to Login', () => {
  const heading = fixture.debugElement.query(By.css('app-heading')).nativeElement;
  const result = heading.getAttribute('title');
  expect(result).toEqual('Welcome to Login');
});
It is also possible to query the child component by directive:
it('should initialise page heading to Login', () => {
  const heading: HeadingComponent = fixture.debugElement.query(By.directive('HeadingComponent')).componentInstance;
  expect(heading.title).toEqual('Welcome to Login');
});
Querying by directive is another way to get hold of the child component to perform assertions.
Summary
In this post, we have looked at different types of automated tests in Angular with simple examples. Automated tests increase the quality of your software, make you more confident in maintaining your solution and act as documentation.