
Implement routing in Angular to enable navigation from one view to another. Users click buttons, anchor links and select options in drop-downs to perform tasks in web applications. Routing plays a key role in any modern web application and Angular makes it very easy to implement routing with router outlet.
Angular can understand a URL and take the user to a view in an application. It supports programmatic navigation through component events such as a button click. Angular routing mechanism also logs an activity every-time the URL changes so the back and forward buttons are supported.
Let’s generate a new Angular app with routing and look at how we can create routes for navigation in Angular.
Table of contents
Project Setup
We will start by create a new app using the command-line interface (CLI).
ng new AngularRouting
cd AngularRouting
If you have never used Angular CLI or created a project, get started with Angular.
When you’re asked “Would you like to add Angular routing?”, type y and hit enter.
Also, pick CSS for stylesheet format.
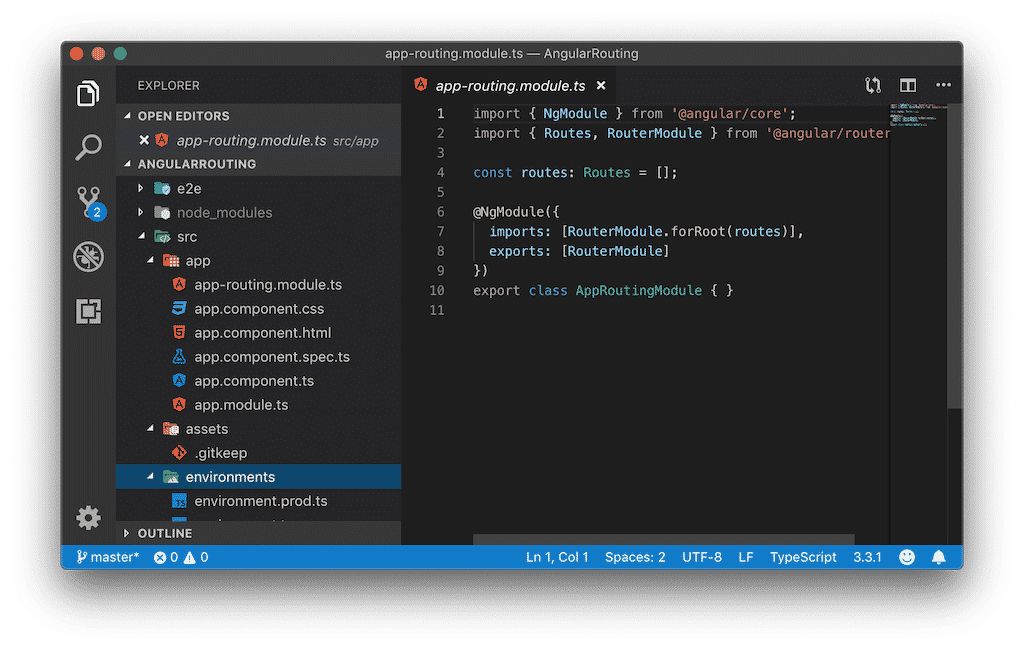
You’ll notice the src folder has a file called app-routing.module.ts. This module is imported into AppModule so that Angular knows the routing configuration of the app.
This is where we import the Angular Router service and define global routes in the application. The routes array is empty because we have not configured it yet.
Angular Router is a singleton service that is responsible for finding a component for a given URL. Singleton means there will only be one router object in the application. When the URL changes, Angular checks the routes array and tells the router to display the correct view.
Tip! You can tell Angular to log all its internal events to the console by setting the enableTracing flag:
imports: [RouterModule.forRoot(routes, { enableTracing: true })]You should only turn this on for debugging purposes.
<base href> Element
To avoid issues in the long term, please open index.html in the root and ensure it has the <base href> element in the head and set to "/".
<!doctype html>
<html lang="en">
<head>
  ...
  <base href="/">
  ...
</html>
What is the base-href element needed for?
The base href element tells Angular routing how to construct internal links. It is set to "/" because the app folder lives in the root folder.
router-outlet
Open up the app.component.html file, where you will find the router-outlet element.
<router-outlet></router-outlet>
You can think of router-outlet as a placeholder in your application. Angular will inspect the URL, match it to a route in app-routing.module.ts and load the component for that route. Let’s create routes and see navigation in action!
Eager-loading Components
Eager-loading means every component in your route setup will be automatically loaded when the application starts. When the route changes, Angular will instantly swap views because all the components are in memory.
Generate a few components (use ng g c home if you’re feeling like a ninja):
ng generate component home
ng generate component customers
ng generate component account
Populate the routes for these components in app-routing.module.ts:
const routes: Routes = [
  // Load home component by default
  { path: '', component: HomeComponent },
  // /home loads home component
  { path: 'home', component: HomeComponent },
  // /account loads account component
  { path: 'account', component: AccountComponent },
  // /customers loads customers component
  { path: 'customers', component: CustomersComponent },
  // Wildcard route handles all other given values
  { path: '**', component: HomeComponent }
];
Add links to app.component.ts for navigation:
<div>
	<ul>
		<li>
			<a routerLink="/home">Home</a>
		</li>
		<li>
			<a routerLink="/customers">Customers</a>
		</li>
		<li>
			<button (click)="goToAccount()">Account</button>
		</li>
	</ul>
</div>
// Components will be injected here
<router-outlet></router-outlet>
As you can see above, our navigation bar consists of HTML anchor tags with routerLink directive instead of traditional href attribute.
Router link directive tells Angular router to perform navigation for a given route. If we had used href, the browser would do a traditional navigation. Unlike the href attribute, you can use routerLink on buttons for navigation.
Account button has a click event handler, which uses the router to navigate to the account route.
export class AppComponent  {
  constructor(private router: Router){}
  goToAccount(){
    this.router.navigate(['/account']);
  }
}
Run your application using ng serve --open in a new window to test it out.
Alternatively, run the live demo below.
That was easy!
But here’s the catch: Eagerly loading components on startup is fine for demo projects but the initial startup time will increase as your app grows. How can you ensure the app loads faster? The answer is to load components only when you need them with lazy-loading.
Lazy-loading Feature Modules
The size of your app will increase as you add more functionality to your app because you will have many components. You’ll reach a point where the app takes a long time to load initially. With lazy-loading (also known as asynchronous routing), we can load components on-demand when the user navigates to that component.
In order to implement lazy-loading, we need to organise the application a little bit.
We first need to create a feature module for each area we’d like to lazy-load. So for customers, we’ll have a feature module called customers.
Creating a module for customers will also allow us to place other customer-related components. Read more about using feature modules in Angular.
ng new AngularLazyRouting
cd AngularLazyRouting
ng generate module home
ng generate component home/Home
ng generate module customers
ng generate component customers/CustomerList
ng generate component customers/CustomerDetail
ng generate module account
ng generate component account/AccountHome
Execute commands above one at a time to generate a new project with routing and three feature modules.
Each module has an initial component to display.
Customers feature module also has a detail component, which is for demonstrating how to setup routing in a feature module.
Run the demo below to see what it looks like in action.
You’ll notice that I haven’t changed the navigation links in app.component.ts. These links map to the same global routes so there is no need to change anything.
We enable lazy-loading of feature modules with loadChildren property, setting it to the path of the module and specifying the class name at the end.
Here is the new routes array:
const routes: Routes = [
  {
    path: '',
    loadChildren: './home/home.module#HomeModule'
  },
  {
    path: 'home',
    loadChildren: './home/home.module#HomeModule'
  },
  {
    path: 'account',
    loadChildren: './account/account.module#AccountModule'
  },
  {
    path: 'customers',
    loadChildren: './customers/customers.module#CustomersModule'
  }
];
With this configuration of global routes, each feature module is loaded into the application as chunks when the user navigates to that area. Thus, each module must define its own routes.
For example, customer path tells Angular to look at the CustomersModule routes for navigation. Upon inspecting the customers-routing.module.ts file, you can observe that it has an empty path for showing the list of customers, and customer-detail path for showing the details of a customer.
We’re effectively combining eager-loading and lazy-loading here.
Because the AppComponent loads on startup (eager-loading) and feature modules are loaded on-demand (lazy-loading).
// customers-routing.module.ts
const routes: Routes = [
  { path: '', component: CustomerListComponent },
  { path: 'customer-detail', component: CustomerDetailComponent },
];
In a real-world app, you’d want to pass some kind of a customer identifier to CustomerDetailComponent for retrieving the data. Look at how to pass data through routes with parameters, if you want to achieve this.
Pre-loading Modules
We’ve seen how to load all the components on startup with lazy-loading. and loading feature modules on-demand with lazy-loading.
Pre-loading is something in between eager-loading and lazy-loading.
If you envisage that a user is highly likely to visit the account area after loading the application, you can pre-load the account module in the background.
This means that the account module is not loaded on startup so the app loads fast initially.
Since the account module loads in the background, it will probably finish loading the module by the time user navigates to account area.
// app-routing.module.ts
const routes: Routes = [
  //...
  {
    path: 'account',
    loadChildren: './account/account.module#AccountModule',
    data: { preload: true }
  }
  //...
];
You can re-load all feature modules, however, this might not be a great idea for mobile users in the context of a large application.
RouterModule.forRoot(
  appRoutes,
  { preloadingStrategy: PreloadAllModules }
)
Highlighting Active Route Link
When a user navigates to customers area, you may want to highlight that customers link in the navigation bar.
RouterLinkActive directive allows you to add a css class when the route becomes active.
<a routerLink="/home" routerLinkActive="active">Home</a>
You can then style the active link using CSS.
.active{
  color: red;
}
Here is a demo for highlight current nav link.
Passing Data Through Routes with Parameters
In most web applications, it is a common requirement to pass some kind of an identifier or an object to a view. Angular router uses patterns to pass route parameters and extracts parameters with ActivatedRoute service.
For example, when the navigation occurs to customer detail view, you would need to know the id of the customer to retrieve that customer from a back-end API.
Angular router supports route parameters through token placeholders in the path property.
// customers-routing.module.ts
const routes: Routes = [
  { path: '', component: CustomerListComponent },
  { path: 'customer-detail/:id', component: CustomerDetailComponent },
];
Pay attention to the :id token the the route definition for CustomerDetailComponent.
The id token allows us to pass data into a component, which can be used to populate the view of that component.
For example, the following URL tells the router to show CustomerDetailComponent and supplies 29 as the id.
customers/customer-detail/29
or from typescript code using Router:
constructor(private router: Router) {}
this.router.navigate(['/customers', 29]);
This then allows the detail component to extract the id parameter with the ActivatedRoute service. Since we subscribe to the route, ensure you import Observable from rxjs.
// customer-detail.component.ts
constructor(private route: ActivatedRoute) {}
ngOnInit() {
  this.route.params.subscribe(params => {
    alert(params.id);
  });
}
Here is a live demo for passing customer id in the route:
Passing Multiple Parameters
In some cases, you may want to pass multiple parameters in Angular routes. This can be achieved with the following syntax in route parameters array:
// customers-routing.module.ts
const routes: Routes = [
  { path: '', component: CustomerListComponent },
  { path: 'customer-detail/:id/:name', component: CustomerDetailComponent },
];
The above configuration implies that a second parameter, name, is expected in the URL.
You can pass the second parameter as an additional value in the navigate() method like so:
constructor(private router: Router) {}
this.router.navigate(['/customers', 29, 'John Doe']);
Pass Complex Objects in the Route
Angular router makes it easy when it comes to passing complex objects as parameters. There is no need to use a different route configuration, just remove the name of the parameter. Angular will pass object values as a matrix in the URL.
// customers-routing.module.ts
const routes: Routes = [
  { path: '', component: CustomerListComponent },
  { path: 'customer-detail', component: CustomerDetailComponent },
];
We can pass the customer object into the component using the following routerLink syntax. Define a customer object in customer-list.component.ts and pass it into the routerLink value.
customer: any = { id: 29, name: "Mr John Doe" };<a [routerLink]="['/customer-details', customer]">View customer detail</a>
You can also achieve this programmatically using typescript:
constructor(private router: Router) {}
const customer = {name: "Mr John Doe"};
this.router.navigate(['/customers/customer-detail', customer]);
Extracting the object from the route is same as previously; just subscribe to the paramaters as shown below.
// customer-detail.component.ts
constructor(private route: ActivatedRoute) {}
ngOnInit() {
  this.route.params.subscribe(params => {
    alert(params.id + " " + params.name);
  });
}
Summary
Well done for making it this far!
In this post, we setup a new Angular project with routing and implemented navigation with eager-loading, lazy-loading and pre-loading techniques. We also looked at how to highlight navigation links with CSS and passed data through route parameters.

![Read more about the article Making Styles Work with [innerHtml] in Angular](https://onthecode.co.uk/wp-content/uploads/2022/12/Angular-768x402.png)